When it comes to manufacturing, making sure your product is sealed properly is a big deal. No one wants a part that leaks. That’s where the vacuum decay leak test comes in. It’s a simple, reliable, and non-destructive way to check the integrity of sealed components, and it’s become a go-to technique for many manufacturers.
How the Vacuum Decay Leak Test Works
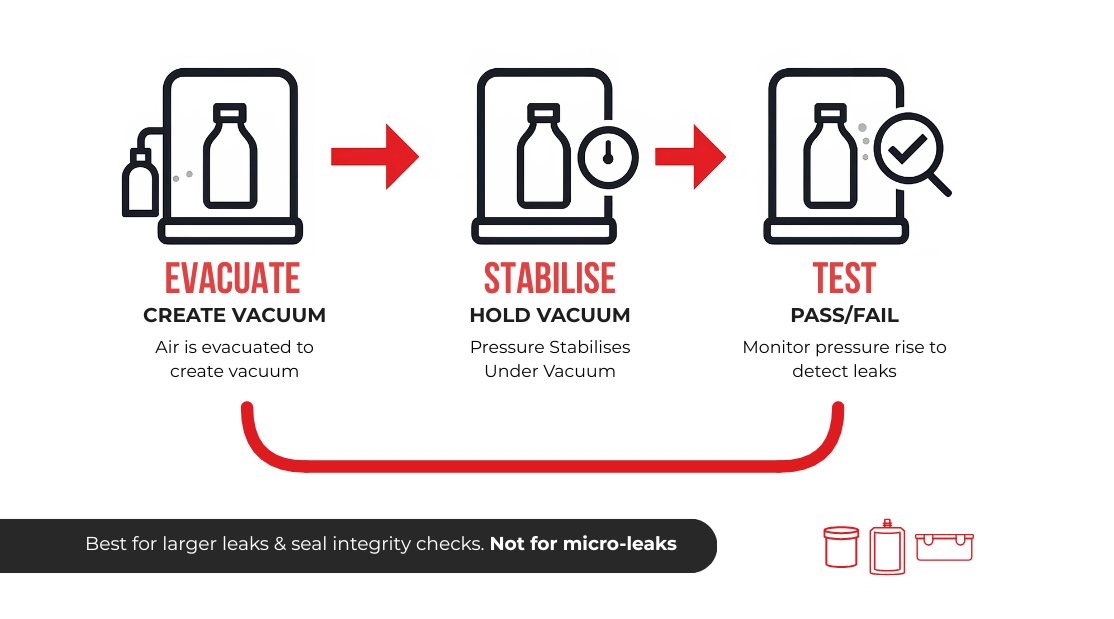
Think of this test as the opposite of a pressure decay test. Instead of pushing air in, we pull it out by creating a vacuum inside or around the component being checked. Once the vacuum is in place, the system is closed off. If the pressure starts to rise over time, it’s a clear sign there’s a leak. The bigger the pressure increase, the bigger the leak.
Curious how this stacks up against pressure decay testing? Check out our comparison of Vacuum Decay vs Pressure Decay Testing to see which method fits your application best.
This method works best on components that can handle vacuum conditions without collapsing. It’s often used to spot obvious leaks or confirm that a seal is holding up as it should.
Why Manufacturers Like This Method
So, why do so many companies choose the vacuum decay leak test? Here are some of the key reasons:
- Clean and simple: No tracer gases like helium or hydrogen are needed.
- Fast: Short cycle times make it ideal for busy production lines.
- Cost-effective: Equipment and running costs are generally lower compared to tracer gas systems.
- Non-destructive: The part being tested doesn’t get damaged, so it’s ready for the next step straight away.
- Consistent results: Less affected by changes in room temperature compared to pressure decay tests, thanks to the lower internal pressure.
The Limitations You Should Know About
Of course, no method is perfect. The vacuum decay leak test has its limits. For one, its sensitivity is relatively low (around 10⁻² mbar·litre/sec), so it may not pick up very tiny leaks. That’s why helium testing is often the better choice when you need extreme precision, like with hydrogen tanks or advanced cooling systems.
Other things to watch out for include:
- Out-gassing and evaporation: Moisture or gases released from the material itself can create false leak readings.
- Pressure limits: The maximum pressure difference is 1 bar, which means parts designed for higher pressures may not be suitable.
- Stress in the wrong direction: The test applies stress opposite to how the part usually operates, which might cause leaks to close instead of open, leading to inaccurate results.
Because of these factors, this method isn’t usually recommended as a final leak test for complete assemblies.
Setting Up the Test Properly
Getting accurate, reliable results depends on how well the system is set up. Here are some key tips:
- Chamber design: Keep the chamber volume as close to the part’s volume as possible, with tight seals to avoid outside interference.
- Control the environment: Keep temperature and humidity stable to avoid inconsistent readings.
Quality components: Reliable valves, sensors, and timers help ensure repeatable results. - Regular checks: Calibration with certified leak standards (UKAS or NIST) and routine maintenance on pumps and seals are essential.
- Automation: Automated setups reduce human error and improve consistency in high-volume production.
Where It Fits Best
The vacuum decay leak test is a great balance of simplicity, speed, and affordability. It’s particularly useful for detecting bigger leaks and making sure seals are holding up in parts that can handle vacuum conditions. But if you’re working with highly sensitive or safety-critical applications, you’ll probably need the extra precision that tracer gas testing provides.
In the end, it’s about choosing the right tool for the job. The vacuum decay leak test is a smart, reliable option for many situations, but it’s not a one-size-fits-all solution.